Replacement Parts
| Tool | 9916-35-AHT | 9916-35-VSHT |
| Flaring Rod | 9903-T643-5-BB | 9903-T674-2-BB |
| Circlip | 9903-T643-11-BB | 9903-T643-11-BB |
| Retainer Ring | 9903-T643-12-BB | 9903-T643-12-BB |
Procedure for replacing a dull or damaged flaring rod
CAUTION: The Flaring Rod is sharp!
During this procedure, be careful that you do NOT:
1) get cut by the Flaring Rod and / or
2) nick or damage the Flaring Rod. (If you do, you will need to replace it again!)
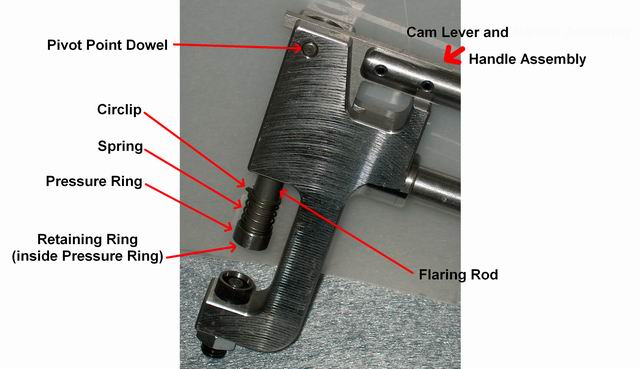
See the photo below for parts location and identification.
- Remove the Flaring Rod: The flaring rod is removed through the
top of the tool body. This is done as follows:
- Remove the pivot point dowel pin by gently tapping it out. Set it aside for reuse.
- Remove the Cam Lever and Handle Assembly. Set it aside for reuse.
- Push up the Pressure Ring and remove the Retaining Ring. Set this aside for reuse.
- Once the Retaining Ring has been removed, the Pressure Ring and the Spring will slip off.
- Remove the Circlip. Set this aside for reuse.
- The Flaring Rod will now slip through the top of the tool body. When removing the Flaring Rod, be careful not to loose or damage the spring inside of the tool body.
- Install the replacement Flaring Rod:
- Insert the replacement Flaring Rod through the tool body. Make sure that the rod goes through the spring inside the tool body.
- Reinstall the Circlip.
- Place the Spring and Pressure Ring back on the Flaring Rod.
- Push up the Pressure Ring and reinstall the Retaining Ring.
- Reinstall the Cam Lever and Handle Assembly.
- Reinstall the pivot point dowel.
- Readjust cup nest height so that the space between it and the end of the flaring rod equals the panel thickness, with the tool closed.